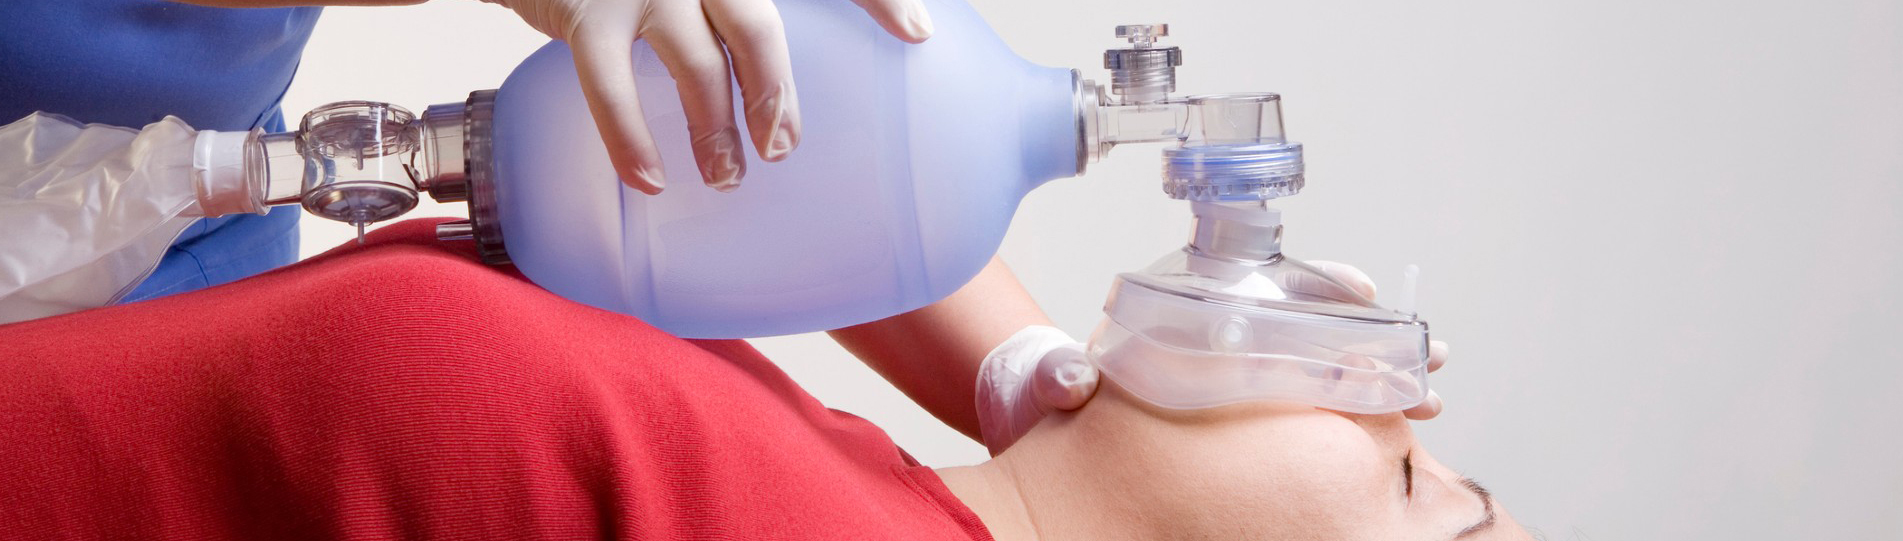
تخيل مريضًا ينهار أمامك ويتوقف عن التنفس. هل ستعرف ماذا تفعل في أول 60 ثانية؟ خطوتك الأولى: وضع المريض في الوضعية المناسبة وفتح مجرى الهواء. هذا الإجراء البسيط يوفر وقتًا ثمينًا.قناع الصمام الكيسي (BVM)يُقدّم نفس الإنقاذ اللازم للحفاظ على تدفق الأكسجين.
تُظهر بيانات دراسات توقف القلب أهمية هذا الأمر. فقد حقق المرضى الذين تلقوا تهوية اصطناعية خلال نصف فترات توقف الإنعاش القلبي الرئوي على الأقل نسبة عودة تلقائية للدورة الدموية قبل الوصول إلى المستشفى بلغت 40.7%، مقابل 25.2% للمرضى الذين تلقوا تهوية أقل تكرارًا. كما تضاعفت نسبة النجاة حتى الخروج من المستشفى ثلاث مرات تقريبًا.
إتقان تقنية قناع الصمام الكيسي (BVM) مهارة أساسية في الرعاية الطارئة. تتوافق الخطوات مع إرشادات الإنعاش القياسية. يلزم استخدام معدات عالية الجودة، مثل أقنعة الصمام الكيسي (BVM) منتيانزو ميديكاليضمن التهوية الفعّالة. يُرسي تدريبك على الإسعافات الأولية الأساسية هذا الأساس. تُعلّم شهادة الإسعافات الأولية الأساسية هذه المبادئ. يجب على كل مسعف أن يتدرب حتى يصبح هذا الأمر غريزة.
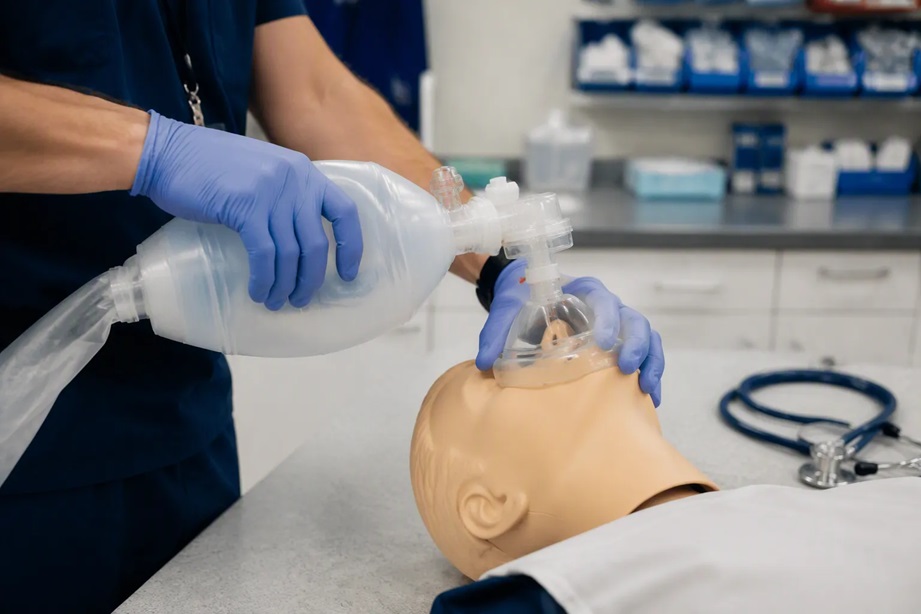
قناع الصمام الكيسي هوجهاز الإنعاش اليدوييوفر هذا الجهاز تهوية بضغط إيجابي للمرضى الذين لا يستطيعون التنفس بشكل كافٍ بمفردهم. يتم الضغط على الكيس ذاتي الانتفاخ لدفع الهواء أو الأكسجين إلى رئتي المريض، ثم يُترك ليسمح بالزفير. يعمل هذا الجهاز كحلقة وصل بين إدارة مجرى الهواء الأساسية والتدخلات المتقدمة، مما يمنحك التحكم الكامل في كل نفس تقدمه.
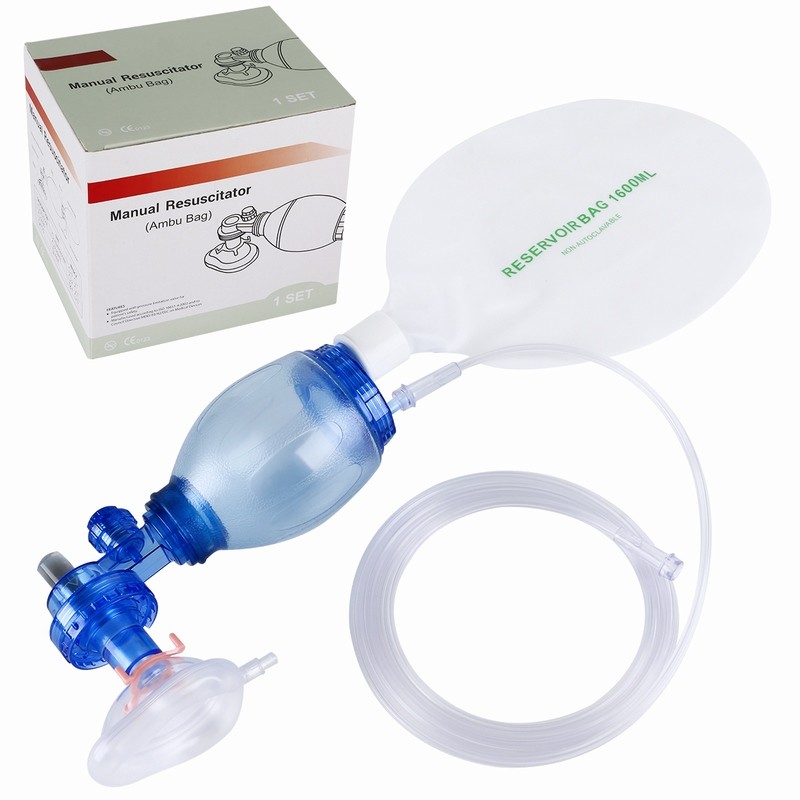
إن فهم كل جزء من أجزاء قناع صمام الكيس يساعدك على استخدامه بفعالية أثناء حالات الطوارئ.cy. كل مكون يلعب دورًا محددًا في توفير تهوية آمنة.
|
عنصر |
وظيفة |
|---|---|
|
كيس خزان الأكسجين |
يخزن الأكسجين لضمان توصيل نسبة عالية من الأكسجين المستنشق (FiO2)؛ ويمتلئ عند انخفاض مستوى الأكسجينالإمدادات كافية |
|
مدخل الأكسجين |
يتصل بمصدر الأكسجين لتوفير الأكسجين الإضافي |
|
صمام السحب (ثلاثة صمامات رفرفية) |
يتحكم في تدفق الغاز: غشاء قرص السحب يمنع التدفق العكسي؛ صمام رفرف خزان المدخل يسمح بدخول هواء الغرفة عند عدم كفاية إمداد الأكسجين؛ صمام رفرف خزان المخرج يحرر الضغط الزائد لمنع الضرر |
|
كيس تهوية |
حقيبة ذاتية النفخ يتم ضغطها لتوصيليتنفس؛ ينكمش ليعيد ملء نفسه بالأكسجين أو الهواء |
|
صمام المريض |
يوجه تدفق الهواء الشهيقي إلى المريض وتدفق الهواء الزفيري بعيدًا لمنع إعادة التنفس؛ ويشمل منافذ للشهيق والزفير |
|
صمام تخفيف الضغط |
يمنع الضغط المفرط، خاصة في نماذج الأطفال |
|
صمام ضغط الهواء الإيجابي |
يُوصل بمنفذ الزفير للحفاظ على ضغط نهاية الزفير الإيجابي |
تنكمش حقيبة التهوية تلقائيًا بعد كل ضغطة، ساحبةً معها غازًا نقيًا. ويضمن نظام الصمام أحادي الاتجاه خروج هواء الزفير دون اختلاطه بالأكسجين الداخل. يجب فحص جميع المكونات قبل الاستخدام، وخاصة الصمامات، لأن أي عطل في الصمام قد يُؤثر سلبًا على عملية التهوية بأكملها.
ستلجأ إلى جهاز الإنعاش اليدوي ذي القناع والصمام الكيسي (BVM) في العديد من الحالات الحرجة. ويأتي الفشل التنفسي في مقدمة هذه الحالات، عندما يكون تنفس المريض سطحيًا أو ضعيفًا جدًا بحيث لا يكفي للحفاظ على مستويات الأكسجين الكافية. ويتطلب توقف القلب تهوية فورية باستخدام جهاز BVM أثناء الإنعاش القلبي الرئوي، لأن ضغطات الصدر وحدها لا تكفي لتوفير الأكسجين اللازم للدماغ. كما يُستخدم الجهاز أيضًا للتزويد المسبق بالأكسجين قبل التنبيب، حيث يملأ رئتي المريض بتركيز عالٍ من الأكسجين لتوفير هامش أمان أثناء العملية.
يركز تدريبك على الإنعاش القلبي الرئوي الأساسي على سرعة التعرف على هذه الحالات. يجب اتخاذ قرار بدء التهوية اليدوية باستخدام قناع التنفس في غضون ثوانٍ من تحديد عدم كفاية التنفس. إن تأخير هذا التدخل يقلل من فرص نجاة المريض. في جميع الأحوال، يبقى هدفك واحدًا: توصيل الأكسجين بفعالية مع الاستعداد لإدارة مجرى الهواء بشكل نهائي. يمثل كيس الإنعاش اليدوي الذي تحمله حلقةً أساسيةً في سلسلة النجاة، وتبدأ إدارة مجرى الهواء بوضع القناع وإحكام إغلاقه بشكل صحيح.
قبل إعطاء أي نفس، يجب عليك تجهيز معداتك ومريضك. تحدد هذه المرحلة من إدارة مجرى الهواء ما إذا كان تهوية قناع التنفس اليدوي ستنجح أم لا. تتطلب التهوية الفعالة باستخدام قناع التنفس اليدوي تحضيرًا دقيقًا.
مهمتك الأولى هي اختيار مقاس القناع المناسب. تختلف أقنعة البالغين والأطفال والرضع في الشكل والحجم. القناع غير المناسب يُسبب فجوات وتسريبات. افحص كل جزء من أجزاء قناع صمام الكيس بحثًا عن أي تلف ظاهر. اضغط على الكيس وراقبه وهو يرتد بالكامل. هذا يُؤكد سلامة قناع صمام الكيس. اختبر صمام الفتح بالضغط على الكيس والتأكد من أن الصمام يفتح ويغلق بشكل صحيح. افحص قناع الوجه بحثًا عن أي تشققات أو تمزقات أو تآكل في الحشوة الداخلية التي قد تُسبب التسريبات. الأداء المُستمر يعتمد على نظام خالٍ من التسريبات.
قم بتجميع الكيس ذاتي النفخ، والقناع ذي الحجم المناسب، وأنبوب الأكسجين، وخزان الأكسجين. وصّل مصدر الأكسجين واضبط معدل التدفق على 10-15 لتر/دقيقة. ثبّت جميع الوصلات بإحكام. قد ينفصل أنبوب الأكسجين غير المُحكم أثناء الاستخدام. يُرجى الانتباه إلى أمر هام عند التخزين: إذا لم يكن جهاز الإنعاش ذو الكيس والصمام والقناع (BVM) مصممًا للطي، فإن تخزينه مضغوطًا لفترات طويلة قد يُقلل من مرونة الكيس، مما يُؤثر سلبًا على فعاليته في حالات الطوارئ. تمنع صمامات تخفيف الضغط، الشائعة في نماذج الأطفال، زيادة الضغط على الرئتين. يسمح مشبك التجاوز بالتحكم اليدوي عند الحاجة إلى ضغط أعلى سريريًا. يجب أن يشمل تدريبك على الإنعاش القلبي الرئوي الأساسي (BLS) فحص هذه التفاصيل. تُوفر عادات الإنعاش القلبي الرئوي الأساسي الجيدة الوقت في حالات الطوارئ الحقيقية.
ضع المريض على ظهره على سطح مستوٍ وثابت. يتيح لك هذا الوضع الوصول إلى مجرى الهواء. افتح مجرى الهواء باستخدام تقنيات تحديد موضع مجرى الهواء المناسبة. بالنسبة للمرضى غير المصابين بصدمة، استخدم مناورة إمالة الرأس ورفع الذقن. أمل رأس المريض للخلف بالضغط على جبهته. ارفع ذقنه للأمام بأطراف أصابعك. هذه الحركة تُبعد اللسان عن مؤخرة الحلق.
بالنسبة للمرضى الذين يُشتبه بإصابتهم في العمود الفقري، استخدم مناورة دفع الفك. ضع أصابعك خلف زاوية الفك وارفعها للأمام دون إمالة الرأس. تعتمد كلتا الطريقتين على النتوءات العظمية لتحقيق فائدة ميكانيكية. تجنب الضغط على الأنسجة الرخوة أسفل اللسان، فقد يُسبب ذلك انسدادًا.
ضع القناع بشكل صحيح. ضع الطرف الضيق فوق جسر الأنف. يجب أن يغطي القناع الأنف والفم بالكامل، مع تجنب أي فراغات. إذا كان المريض فاقدًا لأسنانه، فإن ترك طقم الأسنان في مكانه قد يُحسّن من إحكام القناع. تساعد الملحقات الأنفية البلعومية والفموية البلعومية على دفع اللسان والأنسجة الرخوة إلى الأمام. وهي مفيدة بشكل خاص للمرضى فاقدي الوعي. يجب أن تتضمن تقنيتك التحقق من ارتفاع الصدر مع كل نفس. هذا يؤكد فعالية تهوية جهاز التنفس اليدوي. توفر أقنعة التنفس اليدوي من الشركات المصنعة الموثوقة أداءً ثابتًا.
يُمثل استخدام قناع التنفس اليدوي بمفردك تحديًا كبيرًا. إذ يتطلب الأمر إدارة مجرى الهواء، وإحكام إغلاق القناع، والضغط على الكيس في آنٍ واحد. ويُعد إتقان هذه التقنية، التي تتطلب مُنقذًا واحدًا، مهارة أساسية في الإنعاش القلبي الرئوي الأساسي. ويعتمد نجاحك على إجراءين حاسمين: تحقيق إحكام إغلاق القناع، وإيصال التنفس بدقة متناهية.
The foundation of effective bvm ventilation is a perfect mask seal. Without it, air escapes, and your efforts fail. The E-C clamp technique provides the mechanical advantage you need for one-handed control. Form a "C" with your thumb and index finger. Place these digits on the top of the mask, applying gentle downward pressure over the bridge of the nose and the bony part of the chin. Your remaining three fingers form an "E." Hook these fingers under the angle of the patient's jaw, along the bony ridge.
Your primary action is to lift the jaw upward into the mask. Do not push the mask down onto the face. Pushing the mask down often distorts the seal and can occlude the airway. Lifting the jaw pulls the tongue and soft tissues forward, opening the airway naturally. This lift creates the space for air to flow. Proper mask placement is confirmed when the mask covers the nose and mouth completely, with the cushion forming a seal against the skin.
Common errors during this process directly compromise ventilation. You must recognize and avoid them.
|
Error |
Impact on Ventilation |
|---|---|
|
Applying pressure to soft tissues of the neck |
Can occlude the airway, impairing ventilation. |
|
Pushing the mask down instead of lifting the jaw |
Can occlude the airway, reducing airflow. |
|
Squeezing the bag too hard or too fast |
Causes stomach insufflation, aspiration risk, and decreased cardiac output, compromising effective ventilation. |
Your goal is a stable, leak-free connection. A high-quality Bag Valve Mask (BVM) with a pliable, conforming cushion makes this seal easier to achieve and maintain.
With a secure seal established, you now focus on the breath itself. Your left hand maintains the E-C clamp. Your right hand squeezes the self-inflating bag. Compress the bag smoothly and deliberately. Aim to deliver each breath over a full second. Watch for the patient's chest to rise. This visible rise is your immediate feedback for adequate tidal volume.
You must control the volume and rate. Squeeze only one-third to one-half of the bag's total volume for an adult. A full compression forces too much air too quickly. This leads to gastric insufflation, where air enters the stomach. A distended stomach increases the risk of vomiting and aspiration. It also pushes against the diaphragm, reducing lung capacity. After each breath, allow the bag to recoil fully before delivering the next. Full recoil ensures the bag refills with oxygen.
Control your ventilation rate. For a patient with a pulse but absent breathing, provide one breath every 5 to 6 seconds. This equals 10 to 12 breaths per minute. During cardiac arrest with ongoing CPR, you will follow the 30:2 compression-to-ventilation ratio. In either case, a slow, measured pace is critical. Rapid, forceful bag squeezes are dangerous. They can decrease cardiac output by raising intrathoracic pressure, which impedes blood return to the heart.
The limitations of the one-person method are important to understand.
One-rescuer BVM ventilation with minimal training fails to deliver adequate tidal volumes, while two-rescuer BVM ventilation delivers tidal volumes more than recommended and comparable to those seen with endotracheal intubation. Therefore, two-rescuer BVM is more effective for initial resuscitation.
This evidence highlights a key point. The single-rescuer technique is physically demanding. Fatigue can quickly degrade your mask seal and the quality of your squeezes. Your bls training prepares you to use this method when you are alone. You should always call for help to transition to a two-person technique as soon as possible. ReliableBag-Valve-Mask (BVM) Resuscitatorssupport consistent performance, but your technique dictates the outcome. Focus on a good seal, watch for chest rise, and deliver slow, steady breaths to provide safe, effective positive-pressure ventilation.
When you integrate bvm ventilation into CPR, your timing matters. The goal is to deliver oxygen without interrupting blood flow. Data from a multicenter study shows the impact of effective ventilation. Patients who received lung inflation in at least half of the chest compression pauses achieved 40.7% return of spontaneous circulation. Those with less frequent ventilation reached only 25.2%. Survival to hospital discharge nearly tripled, from 4.1% to 13.5%.
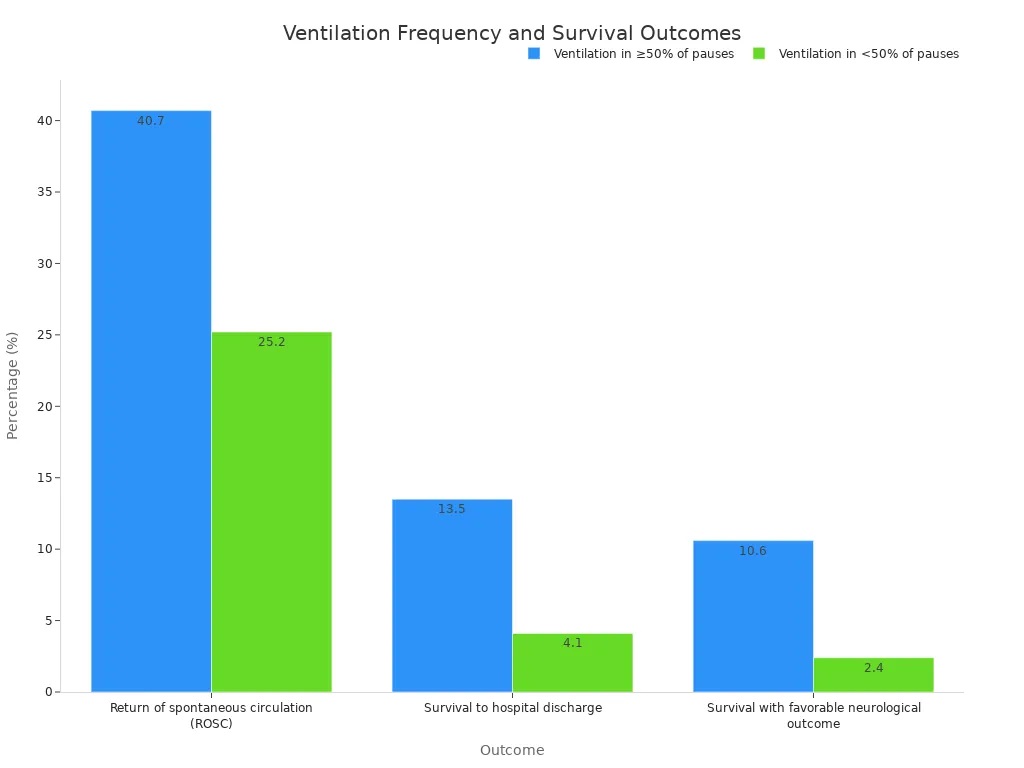
Your technique during CPR follows a specific sequence. Deliver one bvm breath over one second. Watch for the chest to rise visibly. Provide only enough air to achieve this rise. Avoid over-ventilating, as excessive pressure increases intrathoracic pressure and reduces blood return to the heart. If an advanced airway is in place, you switch to continuous compressions. Give one breath every six seconds, at a ventilation rate of 10 breaths per minute, without synchronizing with compressions. A Bag-Valve-Mask (BVM) Resuscitator connected to high-flow oxygen supports this rhythm. Your bls training emphasizes minimizing interruptions in chest compressions. Every pause reduces perfusion to the brain and heart. Consistent chest movement and end-tidal CO₂ monitoring confirm effective ventilation.
The 30:2 compression-to-ventilation ratio is the standard for adult CPR. You perform 30 chest compressions, then pause briefly to deliver 2 breaths. This cycle repeats without delay. Evidence from ILCOR guidelines supports this ratio over alternatives like 15:2.
|
Outcome |
30:2 vs 15:2 Effect Estimate |
|---|---|
|
Favorable neurological function |
RR 1.34 (95% CI 1.02–1.76) |
|
Survival |
RR 1.37 (95% CI 1.19–1.59) |
|
Return of spontaneous circulation |
RR 1.11 (95% CI 1.00–1.23) |
The 30:2 ratio prioritizes chest compressions. By limiting pauses to 2 breaths, you maintain blood flow while still providing ventilation. Each breath should last one second. Squeeze only one-third to one-half of the bag volume. This prevents gastric insufflation and maintains cardiac output. During cardiac arrest, a two-person bvm technique is far more effective. One rescuer holds the mask seal while the other squeezes the bag. This reduces fatigue and delivers more consistent tidal volumes. Your bls certification should include practice with both single-rescuer and two-person techniques. Mastering this ratio during CPR ensures you balance ventilation with circulation, giving the patient the best chancefor survival.
When a second rescuer arrives, you should transition immediately to the two-person approach. This method transforms your bvm from a challenging solo task into a coordinated team effort. The two-rescuer technique dramatically improves the quality of bvm ventilation and represents the standard of care in resuscitation scenarios. Your bls training should emphasize this transition as a priority once help arrives.
The two-rescuer technique assigns distinct responsibilities to each team member. Rescuer 1, the Airway Manager, positions at the patient's head. This rescuer uses both hands to secure the mask with a double E-C clamp technique. Your thumbs and index fingers form a "C" shape on the mask surface. Your middle, ring, and little fingers form an "E" along the jawline to lift the mandible upward. You hold the mask stable on the face, lifting the jaw toward the mask rather than pressing the mask down. This action creates a reliable seal without compressing soft tissues. You must reassess the seal after every breath to maintain effectiveness.
Rescuer 2, the Bag Handler, manages the ventilation bag. This rescuer delivers slow, controlled squeezes and stops when visible chest rise occurs. You watch the patient's chest carefully for adequate rise and check for air leaks around the mask. You avoid forceful breaths that cause gastric inflation. Your body mechanics matter: maintain a comfortable position without twisting or reaching awkwardly.
|
Rescuer |
Specific Duties |
|---|---|
|
Rescuer 1 (Airway Manager) |
Positions at the patient's head;uses double E-C clamp; holds mask stable; lifts jaw toward mask; reassesses seal after each breath |
|
Rescuer 2 (Bag Handler) |
Delivers slow, controlled squeezes; stops at visible chest rise; watches for leaks; avoids forceful breaths; maintains proper body mechanics |
The two-rescuer technique offers clear advantages over the single-rescuer method. You achieve a better mask seal because one person dedicates both hands to airway management. This eliminates the struggle of maintaining the E-C clamp while simultaneously squeezing the bag. The result is more consistent tidal volumes with each breath.
Rescuer fatigue decreases significantly. In the one-person method, your hands tire quickly, degrading the seal quality. With two rescuers, each person focuses on one task, sustaining high performance for longer periods. This matters during prolonged resuscitation efforts where quality degrades over time.
Coordination between rescuers follows a specific sequence:
Rescuer 1 performs 30 chest compressions, counting aloud to maintain rhythm.
Rescuer 2, positioned at the head, holds the bag-mask with a C-shaped grip using thumb and index finger to seal the mask, while remaining fingers lift the jaw to open the airway.
Rescuer 2 administers two breaths, each lasting one second, while observing chest rise.
Rescuers switch duties every two minutes, with the rescuer performing compressions calling out "switch."
Counting out loud helps both rescuers anticipate breaths and maintain the correct compression-to-ventilation ratio. This verbal coordination prevents missed breaths or delayed compressions. Your bls training should include practice with this switching protocol to build muscle memory.
The two-rescuer technique also reduces the risk of over-ventilation. With one person dedicated to watching chest rise, you can stop each squeeze precisely when the chest reaches full expansion. This prevents the gastric insufflation and decreased cardiac output associated with excessive pressure. Bag-Valve-Mask (BVM) Resuscitators with clear markings help the Bag Handler gauge appropriate squeeze volumes.
Evidence supports this approach strongly. One-rescuer bvm ventilation with minimal training fails to deliver adequate tidal volumes. Two-rescuer bvm ventilation delivers tidal volumes more than recommended and comparable to those seen with endotracheal intubation. Therefore, two-rescuer bvm ventilation is more effective for initial resuscitation. When a second rescuer is available, this method is always the recommended approach. Your Bag Valve Masks (BVM) equipment performs best when paired with proper two-person technique. Master this coordination through regular practice, and you will provide safer, more effective ventilation during critical emergencies.
You must confirm your bvm delivery is working. The most reliable indicator remains visible chest rise and fall. As one clinical educator warns, "If you do not see the patient's chest rise and fall, your seal is not tight or the airway is not open, and the patient is not receiving the life-saving oxygen they need." Monitor oxygen saturation. A rising SpO₂ reading confirms effective ventilation. Watch for heart rate normalization. In bradycardic patients, an improving heart rate signals adequate oxygenation. Check for improved skin color as circulation returns. Your bls training teaches you to reassess these signs of effective ventilation continuously. Do not assume your technique is correct without verifying these indicators.
Even trained professionals make mistakes. A study by Culbreth and Gardenhire (2021) inHeart & Lungfound that respiratory therapists frequently fail to meet recommended ventilation parameters, including tidal volume and rate. Underventilation often results from a poor mask seal. Overventilation occurs when you squeeze too hard or too fast. Both errors reduce the effectiveness of your bvm ventilation.
|
Pitfall |
Corrective Action |
|---|---|
|
Over-ventilation |
Deliver each breath overone second. Squeeze only one-third to one-half of the bag volume. |
|
Poor mask seal |
Use the E-C clamp technique. Lift the jaw into the mask. Grasp bone, not soft tissue. |
|
Incorrect head positioning |
Reapply the head tilt-chin lift or jaw thrust maneuver to open the airway. |
|
Failure to monitor |
Check chest rise, SpO₂, and heart rate after every breath cycle. |
Over-ventilation raises intrathoracic pressure and decreases cardiac output. Control your driving pressure. Use a gentle squeeze over the full one-second inspiratory time. Allow complete exhalation by following the three-second rule. This prevents gas trapping and maintains proper ventilation.
Poor mask seal is the most common cause of underventilation. If you grasp the soft tissue beneath the mandible, you push the tongue into the posterior pharynx and worsen obstruction. Pull the mandible into the mask rather than pushing the mask onto the face.
Optimize airflow with airway adjuncts. An oral or nasal airway creates a consistent pathway that promotes laminar flow and reduces turbulence. If ventilation remains inadequate, the tongue may be obstructing the airway. Insert an adjunct to displace the tongue forward.
Monitor bag compliance. If the bag feels stiff, lung compliance is low. If pressure builds quickly, resistance is high. Adapt your technique accordingly. For high-resistance conditions like asthma, extend exhalation times. For low-compliance conditions like CHF, consider applying PEEP. Your bag valve mask technique must adapt to the patient's physiology.
Your bls training provides the foundation. Regular practice on mannequins builds muscle memory. Reliable Bag-Valve-Mask (BVM) Resuscitators support consistent performance, but your technique determines the outcome.
Mastering the bag valve mask requires more than reading. You must practice each step until it becomes instinct. Prepare your equipment. Position the patient. Seal the mask with the E-C clamp technique. Ventilate slowly and monitor the chest rise. A good seal forms the foundation of effective bvm ventilation. Over-ventilation causes harm. Remember the goal: slow and steady breaths. Your ambu bag skills need regular practice on mannequins. This builds muscle memory for real emergencies. Enroll in bls or ACLS training. These courses provide hands-on training with professional instructors. Keep your ambu device ready for immediate use. Reliable equipment like Bag-Valve-Mask (BVM) Resuscitators supports your cpr efforts. Your bls certification prepares you for this critical intervention.
Watch the patient's chest. Each breath should take one full second. If you deliver more than 10-12 breaths per minute for a patient with a pulse, you're going too fast. Rapid ventilation causes stomach inflation and reduces blood flow to the heart.
Stop ventilation immediately. Turn the patient's head to the side. Clear the airway with suction or a finger sweep. Reposition the head and resume bvm ventilation. Check that the mask seal remains intact before continuing. This prevents aspiration into the lungs.
No. Pediatric patients require smaller mask sizes and lower bag volumes. Use a pediatric-specific Bag-Valve-Mask (BVM) Resuscitator with a pressure relief valve. Deliver breaths gently, watching for subtle chest rise. Over-ventilation harms children faster than adults due to their smaller lung capacity.
Assign one rescuer to hold the mask seal during transport. That person focuses only on maintaining the E-C clamp position. Another rescuer squeezes the bag. This division of roles keeps the seal stable while the stretcher moves. Practice this coordination during your bls training.
يستخدم قناع الجيب هواء الزفير، موفراً حوالي 16% من الأكسجين. أما قناع الصمام الكيسي فيتصل بمصدر أكسجين، موفراً ما يصل إلى 100% من الأكسجين. كما توفر أقنعة الصمام الكيسي تحكماً أفضل في حجم الهواء الداخل والخارج، وتقلل من إجهاد المسعف أثناء عمليات الإنعاش المطولة.

 شبكة IPv6 مدعومة


 العربية
 English
 فارسی
فارسی français
 Deutsch
 русский
 italiano
 español
 português
 Türkçe